User Authentication with Azure Active Directory
Only users from a single Azure Active Directory (AAD) tenant and external users (guests) of that tenant can log in to Alvao. If you enable AAD authentication in Alvao, no other users outside of AAD will be able to log in to Alvao.
Caution:
If you are switching from
Active Directory (AD) authentication to AAD authentication, pay attention to the options for limiting the set of users and groups imported from AAD that differ from AD, see
Scope below. Before setting up user import from AAD, first disable the existing user import from AD (
ImportAD).
Import users from AAD (user provisioning)
- In the Microsoft Azure portal, navigate to Azure Active Directory - Enterprise Applications and create a new application with New Application - Create your own application.
- Enter the application name Alvao and select Integrate any other application you don't find in the gallery (Non-gallery).
- In the application details, go to the Provisioning tab and set the following provisioning parameters:
-
Provisioning mode: Automati
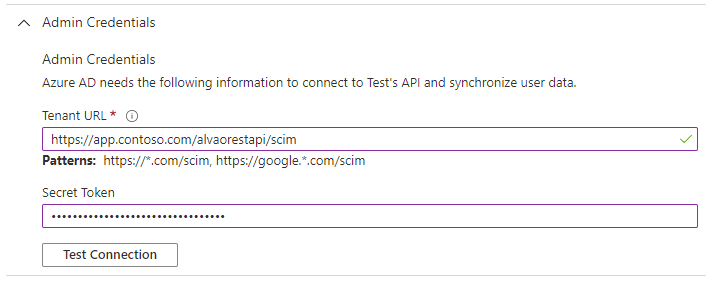
- In the Admin Credentials section:
Tenant URL: {address ALVAO REST API}/scim
E.g.: https://app.contoso.com/alvaorestapi/scim
Secret Token: In WebApp – Administration – Settings - Active Directory and Azure Active Directory generate new client secret key and copy it to this field.
Use the Test connection command to verify that everything is set up correctly.
- In the Mappings section:
Enable setting up users and groups
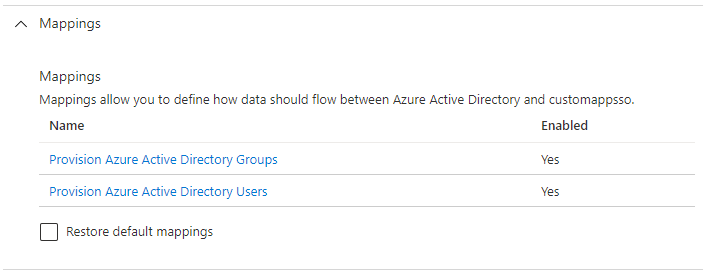
Click Provision Azure Active Directory Users and make the following changes:
- Required:
- For the userName attribute, change the Matching precedence from 1 to 2
- Change the externalId attribute to include the AAD attribute objectId (instead of mailNickname) while setting the matching precedence to 1 for this attribute
- Recommended:
- Use the Add new mapping command to add a new mapping to synchronize the Organization user entry:
- Mapping type: Direc
- Source attribute: companyNam
- Target attribute:
urn:ietf:params:scim:schemas:extension:enterprise:2.0:User:organizatio
- Remove items from the mapping that do not sync with Alvao:
- addresses[type eq "work"].streetAddress, addresses[type eq "work"].postalCod
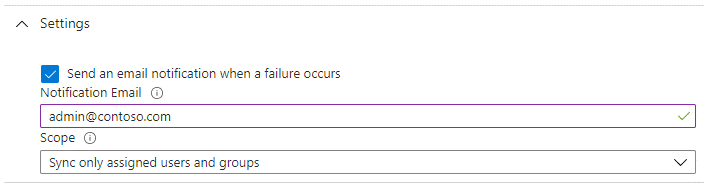
- In the Settings section:
Optionally, fill in the email address to which notifications will be sent in case any errors occur.
Under Scope, select if you want to sync all users from AAD or only selected users.
- Set Provisioning status to On.
- If you selected in Scope that you want to synchronize only selected users and groups, go to the Users and Groups tab and assign the users and groups you want to synchronize with Alvao to the application.
For more information on the various options in the setup, see User provisioning management for enterprise apps in Azure Active Directory | Microsoft Docs.
Setting up AAD authentication
- In the Microsoft Azure portal, navigate to Azure Active Directory - App registrations and select the first created Alvao app.
- On the Overview page, set Redirect URIs to https://<WebApp>/Account/LoginMicrosoftEndpoint.
- On the Authentication page, check Access tokens (used for implicit flows) and save the settings.
- On the API permissions page:
-
Click Add a permission, go to APIs my organization uses tab and select the first created ALVAO app.
-
Check user_impersonation permission and click Add permissions.
-
Grant admin consent for previously added permission
- Make a note of the values from the application registration that you will need later:
-
Client ID
-
Directory (tenant) ID
-
Client credentials - Client secrets - New client secret - Client Secret
- In the following SQL script, insert the Directory (tenant) ID and Client ID values obtained above and run the script on your Alvao database.
INSERT INTO AzureAdTenant (AzureTenantId) VALUES (N'<Directory (tenant) ID>')
EXEC spUpdateInsertProperty N'AzureApplicationId', N'<Client ID>'
- On the server in IIS Manager:
- In Alvao (WebApp), change the authentication method to anonymous and forms.
In the forms login details, specify
~/Account/LoginMicrosoft address.
- In ServiceDeskWebService, set the authentication method to anonymous.
- In AssetWebService (AM WS), set the authentication method to anonymous.
- In AlvaoRestApi, set the authentication method to anonymous.
- In AlvaoCustomAppsWebService (CA WS), set the authentication method to anonymous.
- In the following configuration files, write the AAD_ClientSecret setting to the Client Secret value obtained above:
- WebApp – web.config file
- ServiceDeskWebService – web.config
- AssetWebService – web.config
- MailboxReader – app.config
- AlvaoRestApi – web.config
- AlvaoCustomAppsWebService – web.config
For more information on registering apps in AAD, see Register your app with the Azure AD v2.0 endpoint - Microsoft Graph | Microsoft Docs.
Import users into the object tree in ALVAO Asset Management
If ALVAO Asset Management is activated, users are also automatically imported into the object tree in the Read Objects from Active Directory folder, from where they are moved to the correct location in the tree. The same set of users is imported into the object tree as in WebApp - Administration - Users.
When removing a user from the AAD, the user is automatically blocked in the object tree (see the Account is blocked property) but not removed. Once in a while, we recommend checking the tree for blocked users and removing them if necessary.
If you activate Asset Management after the fact, when you have already imported users into Report, the existing users are not automatically created in the tree. You can additionally create them with a prepared SQL script that creates all users from Report that do not already exist in the object tree. The property values are set according to the default attribute mapping. Existing users will remain unchanged.
Note:
You can also manually create a small number of users in the object tree and set their property values according to the information in the
Message (especially the
User Name property, which is key).
Note:
You can disable the import of users into the object tree with this SQL script if needed:
EXEC spUpdateInsertProperty 'AM.Scim.ImportUsers', NULL, 0;
After executing the script, we recommend recycling the Alvao application pool on the IIS server so that the import shutdown takes effect immediately.
You can turn the import back on with the script:
EXEC spUpdateInsertProperty 'AM.Scim.ImportUsers', NULL, 1;
SCIM
Importing (provisioning) users from AAD to Alvao uses the SCIM interface, through which Alvao automatically:
- Create, edit and delete users in WebApp - Administration - Users
- Create, edit, and delete groups in WebApp - Administration - Groups
- Updates user and group memberships in groups
- Created and edited by users in the object tree in ALVAO Asset Management
AAD sends information about changes to Alvao via the SCIM interface on an ongoing basis. Most changes are reflected in Alvao within 40 minutes, some, such as locking out a user, even sooner. This interval is entirely under the control of AAD and cannot be changed.
The SCIM interface is part of the ALVAO REST API, which must be installed on a server accessible from the Internet (or Azure).
Did not find what you were looking for? Ask our technical support team.