Skip Navigation LinksALVAO 11.2 / Extension modules / ALVAO Azure DevOps Connector
ALVAO Azure DevOps Connector
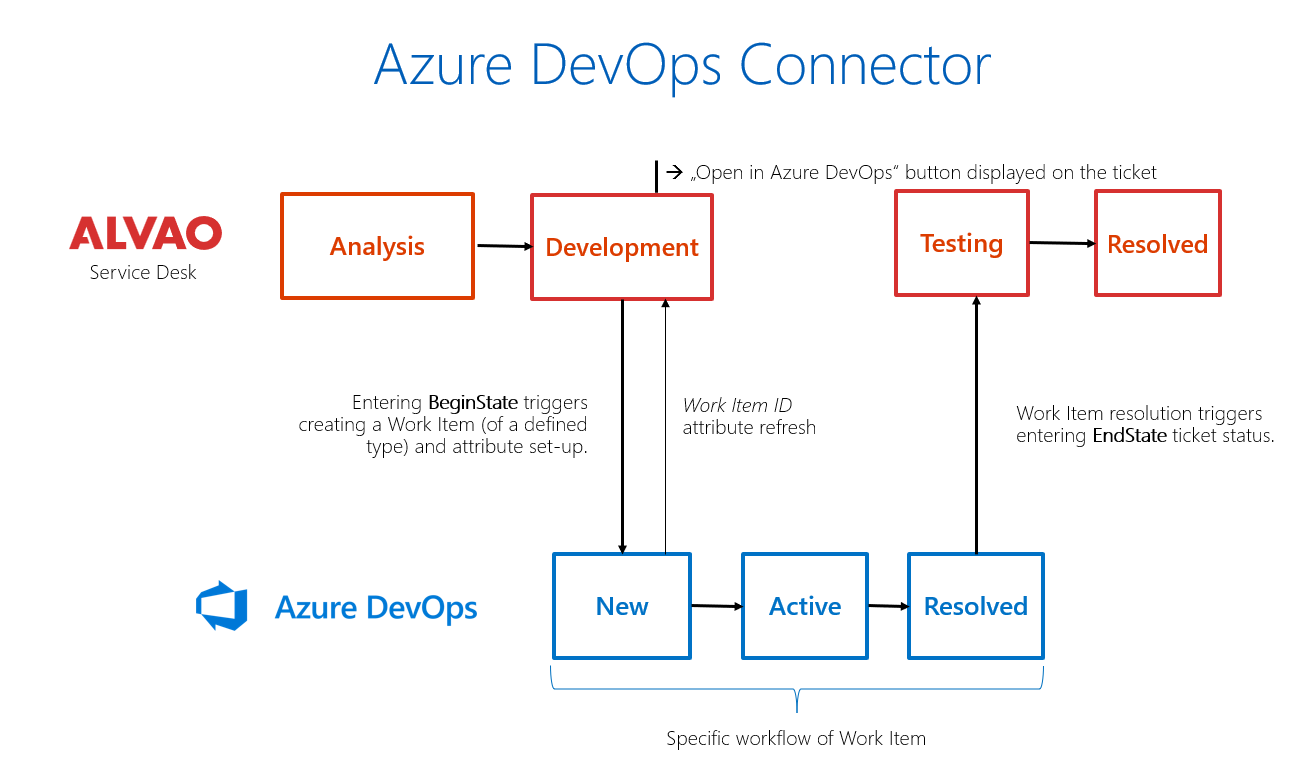
This module connects ALVAO Service Desk and Azure DevOps.
For example, a user submits a ticket to ALVAO Service Desk to modify the ERP system.
After the ticket is approved and a detailed specification of the modification is developed, or immediately after the ticket is created,
a work item is automatically created in Azure DevOps to implement the modification.
After the modification is executed and the work item in Azure DevOps goes to defined status,
the original ticket in Alvao goes to a defined status, e.g. "Synchronization to DevOps". For demonstration, see the image bellow.
Technical requirements
SaaS
- ALVAO ITSM or Service Desk subscription
On-premise installations
- ALVAO Service Desk
- User authentication using Microsoft Entra ID
- REST API accesible from internet
Installation
Administrator rights are required for the installation.
- Download the Azure DevOps Connector App.
- In the Administration - Service Desk - Services tree, select the folder where you want to import the sample service to connect to Azure DevOps, and use the Import command to load the AzureDevOpsConnectorService<Enu/Csy>.xml file, which is included in the AlvaoAzureDevOpsConnector.zip installation package.
- In Administration - Applications, use the Import command to load the AzureDevOpsConnectorApp.xml file.
Azure DevOps Personal Access Token
- In Azure DevOps, create a Personal Access Token (PAT) with Work Items - Read & Write permissions.
- Use Administration - Settings - Advanced page to add a new setting. Insert new setting with name DevOpsIntegrationToken0 and use PAT token from Azure DevOps as the value.
Note:
Alternatively, you can use multiple access tokens if, for example, you need to integrate Azure DevOps from different organizations into Alvao. Create a new setting and increment the number at the end of the setting name. Then use this number in the AccessToken item in the service setting below.
Setting up Azure DevOps
- In Azure DevOps in a given project, use Project Settings - Service hooks - Create subscription.
- Select Web Hooks as the service type and press Next.
- Under Trigger on this type of event, select Work item updated.
- In Field, select the State option. Press the Next button.
- In the URL entry, enter the URL of the AlvaoRestApi application, followed by the path "/Connectors/DevOpsCallback", e.g.: https://contoso.alvao.com/AlvaoRestApi/Connectors/DevOpsCallback
- Select None under Messages to send.
- In Detailed messages to send, also select None and press Finish.
Setting up a service in Alvao
- In Administration - Service Desk - Services, select the service you want to connect to Azure DevOps and use Edit - Properties.
- In the Other section, specify the value of the External Application - Connector Settings custom field. The following settings are written in JSON notation:
- ConnectorType - enter the text AzureDevOps.
- URL - enter the URL of the Azure DevOps project in the form https://dev.azure.com/{organization}/{project}
Example: https://dev.azure.com/Alvao/Alvaoproject
- AccessToken - enter the Personal Access Token (PAT) setting number that you used in advanced settings. (typically 0)
- AttributeMap - specify the mapping of the ticket items, see below for the format of the settings.
- BeginState - specify the name of the ticket status in Alvao in which the ticket will be transferred to Azure DevOps.
Example: Synchronization to DevOps
- EndState - specify the name of the ticket status to which the ticket should transition when the corresponding work item is closed in Azure DevOps.
Example: Return from DevOps
- WorkItemEndState – specify the name of the state in Azure DevOps in which should the ticket change its state in Alvao.
Example: Closed
Example of the entire setup:
{
"ConnectorType": "AzureDevOps",
"URL": "https://dev.azure.com/Alvao/Alvaoproject",
"AccessToken": "0",
"AttributeMap":{"System.Title":"[$TicketTitle$]",
"System.Description":"[$LatestImportantMessage$]",
"System.WorkItemType": "Task"},
"BeginState": "Synchronization to DevOps",
"EndState": "Return from DevOps",
"WorkItemEndState": "Closed"
}
Attribute map
The attribute map for setting up AttributeMap is written in JSON format as a list of properties, where the property name is the name of the item in Azure DevOps.
and the value is a string constant. You can use variables in the values, see below. e.g.:
{"System.Title":"[$TicketTitle$]", "System.Description":"[$LatestImportantMessage$]",
"System.WorkItemType": "Task"}
Each item in Azure DevOps is assigned a value that is written as static text containing variables. You can use the same variables as in the status change notification template to the requester, see Message template.
Did not find what you were looking for? Ask our technical support team.